
webinar > Technical info
INSTRUCTION
CHEETAH Webinar is based on the lectures/presentation offered by speakers/presenters and the utilization of Adobe Connect ® an e-conferencing platform widely diffused in several organziations to propose on line seminars, conferences and e-learning.
NO special Hardware or Software is needed for either the presenters and the audience but
Please read carefully the instruction below:
NOTE: Whether you are a new and inexperienced user in web-conferencing or you are a skillful but you normaly use other webconferencing system than Adobe Connect we suggest you to pay attention to the following information. These advices come back from the lessons we learned by interacting with more than 120 speakers and 2000 live participants, and they will help you in avoiding commonplace troubles.
INSTRUCTIONS TO THE PARTICIPANTS AND SPEAKERS
Following steps help both speakers and participants to get skills in using our webinar platform.
Speakers should also refer the specific section reserved to them to learn how to turn on/off web cam/microphone and to use them properly.
Check you computer :
- Update the operative system for your computer and update your web browser (Internet Explorer, Firefox, Chrome, Safari, etc) particularly if you don’t do this frequently. It will be a pity that the operative System (OS) or the browser of your computer will start to update during the webinar by blocking your computer and your activities for 10-15 minutes or more
- Install your multimedia tools if you have not already done it before:
- Participants need of the reproducing device i.e. loudspeakers and/or headset. and they don't need of web cam/microphone.
- Speakers/presenters must use both recording (microphone) and reproducing devices (audio). They also need of a (optional) webcam
- We warmly suggest speakers to use an headset instead of room loudspeakers becouse the sound of this ones often couples with microphone by producing annoying sounds effects and noise.
To check that your audio works properly please refer to following paragraph "audio setting and troubles"
Check internet connection speed and its quality
A rock-solid internet connection is the essential prerequisite for any effective remote conferencing.
Wi-Fi is obviously more convenient than wired Ethernet cables, but Ethernet still offers significant advantages in stability and speed, and we warmly reccomend speakers to use LAN/Ethernet connection with assigned IP-Internet Protocol address, than a Wi-Fi connection with dynamic assigned IP. A opposite we leave the participants free in chosing their connection.
- Internet datas are carried around in small chunks called packets. Connections speed is only a part the of the whole picture. The other one is the connection stability. If your connection experiences packet losses your browsing slows down, and it causes a decrease in audio/video quality..
- You can use a speed test like http://www.speedtest.net/ or any other one you love to test both uploading/downloading speed and PING- Packet INternet Groper .
- Connection speed > 0.4 Mbps (400 Kbps) or faster for both incoming/upcoming are welcome, particularly for the presenters/speakers becuse they need higher data transfer speed then participants. PING lower than < 50 ms welcome.
- How to Ping more deeply??? Pinging simply sends a data packet to a remote computer, asking that computer to respond. If it responds, it records information about that response for you to elaborate and review results. You can do it by yourselves by using PING command specific for your operative system and by dedicating the test to our web site. The tests you should perform depend from your operative system.You can find more information here.
- If you could meet troubles, let's know and we will be very happy to assist you. Please forward us an email by indicating any useful detail about the troubles you are facing.
Install FlashPlayer ®
- Often weconference systems ask you to download or update Add-in,These are devices and piece of software that can be added to your computer to give extra features or functions. And this also happen when you use Adobe Connect.
- Adobe Connect 9 meetings applications are backwards compatible with earlier versions of Adobe Connect. Please note that although there is currently no application for Linux, users on Linux (Ubuntu, Red Hat and OpenSUSE) can still attend, host, or present in meetings in the browser.
- Install/update FlashPlayer . Adobe Connect needs of FlahPlayer. As you probably know this is a very widely diffused cross-platform plugin plays animations, videos and sound files. We don't suggest you to install other software always Adobe propose you (McAfee, True Key, etc etc) except if you could specifically need of it, becouse istalled software could conflict with your software and Antivirus already installed in your computer.
- LINK TO DOWLOAD ADOBE CONNECT ADD-IN
If you don't intend to install FlashPlayer
- If you do not have Adobe Flash Player and you don't intend to install it, the new version of Adobe Connect suggest to install Adobe Connect meeting application. This application can be installed in two different ways
- Adobe Connect meeting application can be automatically installed during a meeting via lightning download (you will be prompted to accept the download upon attempting to screen share or use functionality that requires the application). This is the most common way to install the application.
- LINK TO ADOBE CONNECT MEETING APPLICATION
You can installed it before your meeting, using the installers below
Extra Adobe Connect dowloads and updates can be find here
Adobe Connect Test link and troubleshotting page
- Adobe Connect also offers @ Adobe meeting Test, a web page you can use to check your connection and install add-ins & plug-ins on request. The suggested link checks following steps:
i. - Flast player version installed in your computer
ii. - Access to Adobe Connect
iii.- LAN/DSL speed test and bandwith
iv.- Installed Add-in in your computer - This page also include useful technical information and troubleshoting.
How to access?
For more information how to access to the webinar room and how interact with the speakers, see the specific section
We summarize here that:
- You will receive your credential to access based on a Uniform Resource Locator (URL), commonly informally termed a web address. You could also receive an alphanumeric code named room passcode, when restricted access is required (see access section)
- When you will receive URL / room passcode by email, or if you will access to this inormation by logging in as CHEETAH Knowledge Exchange platform registered user, you should utilize your credentials to log-in asap and ckeck that everything works properly, and inform us if you will meet troubles. i
Check your listening device (audio)
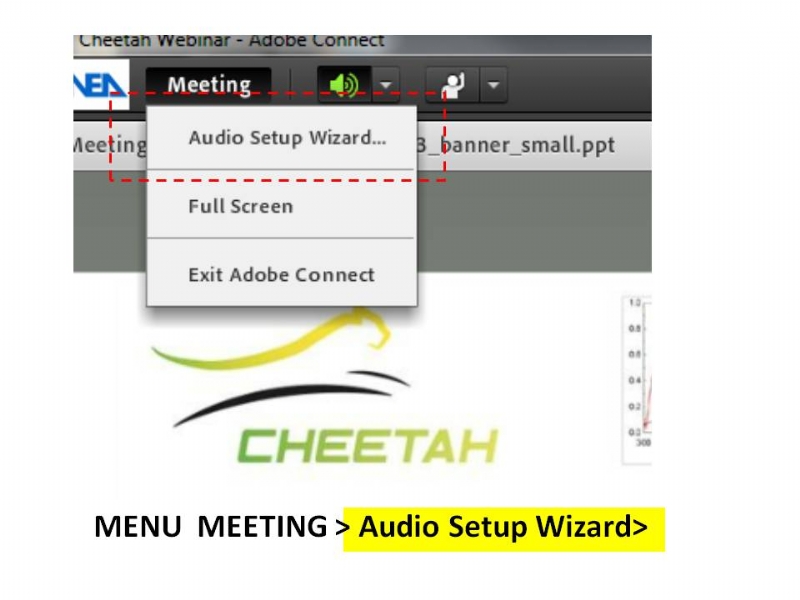
- After logging in to the event virtual room (webinar room) check your audio (loudspeaker/headset) by using menu Meeting > Audio Setup Wizard > test audio (see photo)
- ~60-30 min to start you will also perceive some voice, sounds produced by speakers/assistents.
- Adjust the loudspeaks/headset volume if you could need of it.
- During the presentations and at the end of each lecture, partecipants can interact with both chair and speakers by "live chat" (pls utilize "chat pad". You will find it usually in the right side or central area of your screen.
AUDIO SET-UP AND TROUBLES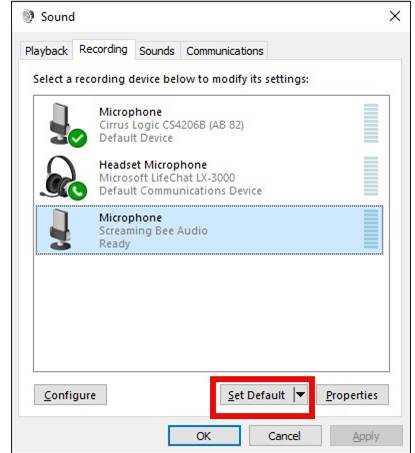
- Take care that if you could not listen any sounds or you could listen it by a very low volume, you have probably left the volume of your loudspeakers/headset at very low level.
- Adjust it by finding icon loudspeaker. It is usually placed in the right-bottom side of your screen. Click by mouse (left button) on the loudspeaker icon and check you volume level.. -- >
- If you will click on the same loudspeaker icon by right mouse button (instead then left button) you can have access to a more complete menu to control the Volume Mixer of your computer for both reproducing tools (loudspeakers/headset) and recording tools (microphone). See photo on right side.
- You can check and you can select which is your reproducing channel (output audio). Adobe Connect will use the reproducing channel (output sound) that you operative system use by default.
- Change reproducing channel, if you would change it or if you are finding troubles in utilizing the default reproducing channel is set by your computer.
- VIDEO/MICROPHONE is authorized to Speakers/presenters only but assistant/chair can also exceptionally authorize the access by microphone/web cam for the registered partecipants on their specific request.
If participants meet audio difficulties/troubles, they can contact us very quickly by adobe connect chat, email, phone , skype (time limit ---> 30 min to start)
SPECIFIC INSTRUCTIONS FOR THE SPEAKERS/PRESENTERS,ONLY
Laptop or a Desktop PC?
People don’t use desktop as in the past, and speaker has probably a laptop of higher quality than his/her own desktop PC. We leave always the final chose to the speaker and we will check that speaker's computer works properly
- Pro -- > laptop is the computer speaker probably normally use . A new laptop is always updated and it has always an high quality web cam and microphone.
- Cons-- > the optical quality of an external HD web cam use on a desktop PC is often of higher quality that a laptop web cam. Furthermore If the speaker tilt the view of his/her screen, speaker also tilts the view of his/her web cam. And very old laptops have often ow quality microphone, low quality web cam and noisily processor fan. This produce low video/audio quality.
- Not depending from the speaker chose, as already indicated above, we warmly suggest to update the OS-Operative System and Web-browser 1-2 days to the event and once again few hours before starting. Often multi-platform ICT companies update their facilities and software overnight. And it will be a puity that the Operative system updating will block your computer.
- Check asap your speed connection, FlashPlayer and add-in by link indicated above. Check reproducing audio (information in paragraph above) and your microphone and webcam (see sections below) above).
Update Flashplayer and Get & Install Adobe Connect ADD-in:
This step is very important for the speakers/presenters becouse they need of a wider control of the teleconferencing system than participants. Add-in is a term used, for a software utility or other program that can be added to a primary program to improve its functions. Adobe Connect Add-in allows meeting presenters and hosts to share their screen, control other users' screens, and upload their files to meetings.
How to share documents/files? How to show them on video to all participants?
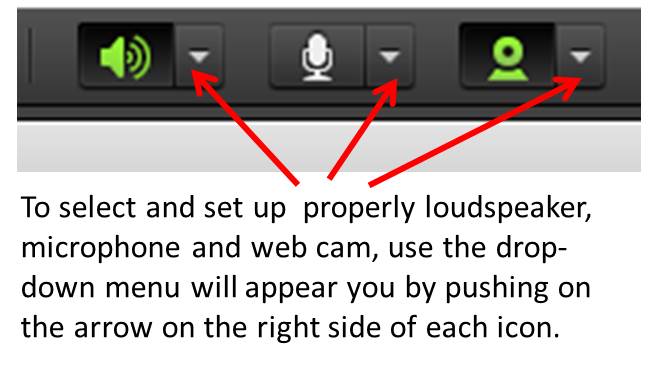
- SPEAKERS/PRESENTERS share their document (usually power point or pdf files) by selecting different "sharing option" offered by the drop-down menu appearing on the computer screen (see photo on right side)
- The speakers can also propose (live) experiments or they can show equipments/ testing/ characterization procedures/ by using video, web cam
ACCESS TO WEBCAM/MICROPHONE IS USUALLY OFFERED TO SPEAKERS/PRESENTERS ONLY

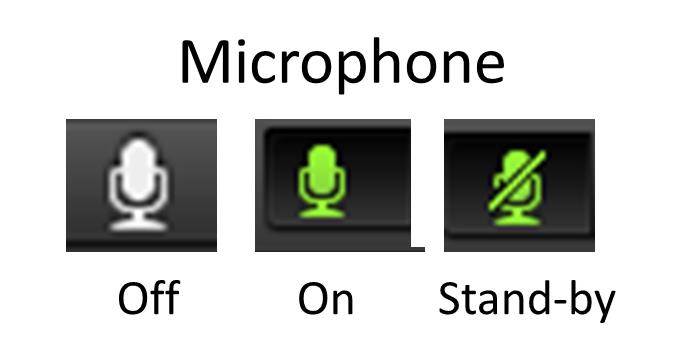
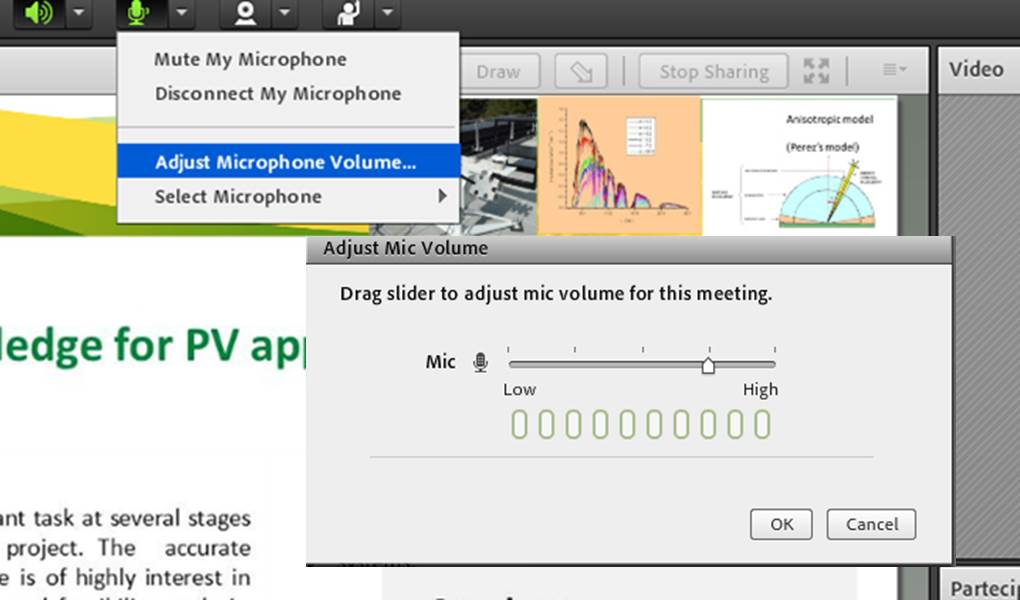
Mouse Click on microphone or web cam icon to turn on/off them
By mouse clicking the icon colour changes from grey to green. If you push once again on the icon you can force microphone in stand-by condition (icon crossed by a bar). To adjust microphone volume you can have acces to the volume pad by clicking on the arrow next to the icon and by selecting Adjust Microphone volume
SPEAKERS --- > MICROPHONE AUDIO SET UP
- As mentioned above, speakers can check by themselves microphone by menu Meeting > Audio Setup Wizard > test audio (see photo above) but audio quality of speaker microphone is very important and CHEETAH assistants will check this properly before starting the webinar.
- Microphone is directly turned on/off or in stand-by by speaker/presenter clicking on microphone icon.
- We warmly recommend to turn always off microphone when you doesn’t need of it in order to avoid echo/noise during other presentations
- We warmly suggest you to use headphone/headset and digital microphone. They produce less audio troubles than loudspeakers and analog microphone. And always a HD web cam has a high quality digital microphone .
- If speaker(s) present their webinar(s) in a conference room, please always pay tightly attention to the room noise and resonance/echo. In fact loudspeakers easily couple with microphone and this could cause a damned annoying sound resonance effect, particularly when audio system is directly coupled to computer line-out.
- keep away microphone from the loudspakers to avoid that sounds could be acustically coupled (echo).
- The quality of speaker(s) microphone and the practice in its use is very important for a successful webconference and We always offer training session to any interested speaker/event chairperson(s)
- Learn from TV newscast more than talk show Telco isn’t a phone call. If more than two speakers turn on the microphone and they don’t synchronize their pause by speaking all togetherthe sound is coupled so deeply and frequently modulated in volume that terrible noise can be produced , and the speakers/presenters voice is continuosly break. In this circumstance audience cannot listen properly the speakers' voice.
- We also warmly suggest presenters/speakers to reduce the volume level for the system signal allert (email arriving, click by mouse, etc) as opposite everyone will listen your system alerts You can access to mixer pad by loudspeakers icon (see section above).
SPEAKERS --- > WEB CAM
- Webcam needs of a two steps process to be switched on.
- First of all by mouse clicking on "web cam icon". The web cam is turned from off to stand-by mode (video preview windows) and the web cam icon change from "grey" color (turned/off) to green color (turned/on)
- Further, you must push "start shading" bottom you can find in the web cam "Preview" video windows
- Utilize an HD web cam (1440p, 1080p o 720p)
- Avoid relevant light in your back. Web cam will not work properly in this condition
Troubleshooting:
If you will find difficulties please contact us by email, phone , skype (time limit ---> 30 min to start)
Firts step: check following link
http://connect.portici.enea.it/common/help/en/support/meeting_test.htm
Further information:
Indicated link report Adobe Connect Meeting Test/Troubleshooting Tips. Inform your ICT colleagues.
- http://helpx.adobe.com/adobe-connect/kb/configure-ports-1935-443-80.html
- http://helpx.adobe.com/adobe-connect/kb/configuring-connect-professional-listen-additional.html
Probably your port firewall/proxy configuration is not meeting the following:
- Port 80 open TCP/UDP for incoming /outcoming traffic
- Port 1935 open TCP/UDP for incoming /outcoming traffic
In fact some corporate firewall/proxy server blocks port 1935 for incoming and outgoing network traffic